轉移至 Nginx
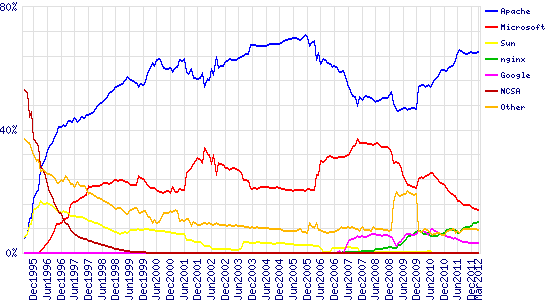
2012 三月全世界的網頁伺服器市佔率圖 from http://netcraft.com/ 。本圖( wpid-overallc.png )非屬 hoamon 創作。
上圖可以看出歷久彌新的 Apache 持續雄距首位,有超過 15 年的時間,沒”器”可挑戰它的地位。直至 Nginx 的出現,或許它現在只有 10% ,但從各方評價看來,它絕對是 Apache 有史以來最強大的對手。短短 5 年,它已經爬上第 3 名的位子,從趨勢線上看來,要超越 IIS 也是有很大的機會。
而 Nginx 為什麼短短幾年竄起,絕不是因為『用的人多』。如果是這種原因的話, palm 、 Windows OS 、 x86 CPU 、 PlayStation 到現在會活得好好地,因為它們都曾有超越 50% 的市佔率。
Nginx 被選擇的原因有幾點:
- 跨平台: *nix, Mac, Windows 皆可。這那算優點呢!!! 那個網頁伺服器沒跨平台,喔喔~講太早了, IIS 就是不能跨平台,或許這就是它市佔率持續下降的原因,強迫綁 Windows OS ,結果只要 Windows OS 下滑,它就必死無疑了。
- 開源的 BSD-like 授權。
- 靜態檔案輸出省資源。
- 不怕慢速連線。
- 比較不怕 DOS 攻擊。
- 穩定性高。
簡單講,除了效能,還是效能。而我要的功能, Nginx 都有提供,唯一算得上缺點的,就是因為 Apache 活得比較久,安全性已被磨得比較好了。所以對於我們愛研究的研究生來說,還有什麼理由不切換過去呢? 大概只有「懶」是個原因吧!
目前我們使用 Apache + Django 的方式多是利用 mod_python 的技術。然而這種作法是比較不安全的,把很多事都包給 Apache 去作,那不管是我們程式設計有錯,或是它用的元件有錯,只要出錯那就是管理員等級的錯。不過這個「錯」也不算是 Apache 的錯,是「用 mod_python 」的錯,如果用的是「 mod_fastcgi 」,那安全層級就能拉高了。
所以說來,這次的「升級」是把「 mod_python 」丟掉,改用「 mod_fastcgi 」。那麼我心裡想想,都要換成 Django 自己跑 fcgi mode 了,為什麼不乾脆連前端網頁伺服器也換一下呢! 因為重點已換成 Django 的 fcgi server , Apache 的重點性大減,前端網頁伺服器的功能只剩下靜態檔案輸出、虛擬站台切換、 https 處理等,那我何必跑一個 Huge Apache 呢? Nginx 就是我的新選擇。
安裝很簡單,如果是在 Ubuntu 中,請打:
$ sudo apt-get install nginx
如果是在 Windows 中,請到官網下載 nginx.zip 檔,解開了,就是一個可執行的 nginx 程式。
而我用的方法是下載源始碼自己編譯:
$ wget some_file_link.tgz
$ tar -zxf some_file_link.tgz
$ cd nginx
$ sudo apt-get install libpcre3-dev libssl-dev # 這些是編譯時,須用到的函式庫程式碼
$ sudo apt-get install libxml2-dev libxslt-dev # 這些是編譯時,須用到的函式庫程式碼
$ sudo apt-get install libgd2-xpm-dev libgeoip-dev # 這些是編譯時,須用到的函式庫程式碼
$ ./configure --prefix=/usr/local/nginx --with-debug --with-http_dav_module \
--with-http_addition_module --with-http_geoip_module --with-http_gzip_static_module \
--with-http_image_filter_module --with-http_realip_module --with-http_stub_status_module \
--with-http_ssl_module --with-http_sub_module --with-http_xslt_module \
--with-ipv6 --with-sha1=/usr/include/openssl --with-md5=/usr/include/openssl --with-mail \
--with-mail_ssl_module
$ make
$ sudo make install
這樣 Nginx 就安裝完成了。
接下來,我們作 Django 程式的設定,讓它可以跑在 fcgi mode 上,方法很簡單,原本我們在本機開發時,都是用:
$ python2.7 manage.py runserver 127.0.0.1:8080
讓它跑在 http://127.0.0.1:8080/ 上,現在則改用:
$ cd /home/somewhere
$ su - someuser -c "python2.7 manage.py runfcgi host=localhost port=3033 daemonize=true method=threaded workdir=/home/somewhere pidfile=/home/somewhere/fcgi.pid"
這樣 django 會在 127.0.0.1:3033 中,幫我們開一個 someuser 帳號權限的 fcgi server ,daemonize=true 則表示指令打完後,它就背景處理了,想要把這個 fcgi server 殺掉,就去看看/home/somewhere/fcgi.pid 的內容,裡面的編號就是系統行程編號, kill 那個編號就能關 fcgi server 了。 同時殺掉 fcgi server ,再馬上啟動它的指令可參考如下:
$ su - someuser -c "kill `cat /home/somewhere/fcgi.pid` && python2.7 manage.py runfcgi host=localhost port=3033 daemonize=true method=threaded workdir=/home/somewhere pidfile=/home/somewhere/fcgi.pid"
請注意在這個階段,你用瀏覽器去看 http://127.0.0.1:3033/ 是沒反應的,因為它現在跑的是 FastCGI 協定,不是 http 協定。瀏覽器無法跟 Django FastCGI 溝通。
接下來,我們再到 nginx.conf 去設定。Nginx 與 FastCGI Server 互動原理如下:
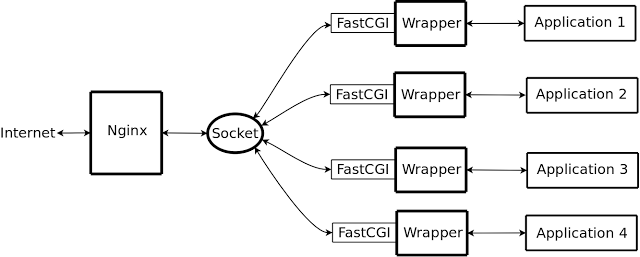
先由 Nginx 與瀏覽器互動,得到 GET, POST 等變數後,整理成 fastcgi 協定的變數,然後用 Socket 或 Port 方式傳遞給 FastCGI Server ,接下來就是 FastCGI 去驅動程式去處理,完成後拋回。
以下是 nginx.conf 的設定範例:
1 2 3 4 5 6 7 8 9 10 11 12 13 14 15 16 17 18 19 20 21 22 23 24 25 26 27 28 29 30 31 32 33 34 35 36 37 38 39 40 41 42 43 44 45 46 47 48 49 50 51 52 53 54 55 56 57 58 59 60 61 62 63 64 65 66 67 68 69 70 71 72 73 74 75 76 | user www-data; # 子行程用的是 www-data 帳號 worker_processes 4; # 常駐 4 個子行程 pid /var/run/nginx.pid; # 紀錄母行程的編號 http { server_tokens off; # 網頁上不顯示伺服器版本編號 sendfile on; tcp_nopush on; tcp_nodelay on; keepalive_timeout 30; types_hash_max_size 2048; include /etc/nginx/mime.types; default_type application/octet-stream; access_log /var/log/nginx/access.log; error_log /var/log/nginx/error.log; gzip on; gzip_disable "msie6"; server { listen 80; server_name www.whatever-you-want.com.tw; root /var/www; index index.html; access_log /var/log/nginx/TW-access.log; error_log /var/log/nginx/TW-error.log; } server { listen 443; server_name www.whatever-you-want.com; keepalive_timeout 60; ssl on; ssl_certificate /etc/ssl/hoamon.info/hoamon.info.crt; ssl_certificate_key /etc/ssl/hoamon.info/hoamon.info.key; location "/" { fastcgi_pass_header Authorization; fastcgi_intercept_errors off; fastcgi_pass 127.0.0.1:3033; fastcgi_param PATH_INFO $fastcgi_script_name; fastcgi_param GATEWAY_INTERFACE CGI/1.1; fastcgi_param SERVER_SOFTWARE nginx; fastcgi_param QUERY_STRING $query_string; fastcgi_param REQUEST_METHOD $request_method; fastcgi_param CONTENT_TYPE $content_type; fastcgi_param CONTENT_LENGTH $content_length; fastcgi_param SCRIPT_FILENAME $document_root$fastcgi_script_name; fastcgi_param REQUEST_URI $request_uri; fastcgi_param DOCUMENT_URI $document_uri; fastcgi_param DOCUMENT_ROOT $document_root; fastcgi_param SERVER_PROTOCOL $server_protocol; fastcgi_param REMOTE_ADDR $remote_addr; fastcgi_param REMOTE_PORT $remote_port; fastcgi_param SERVER_ADDR $server_addr; fastcgi_param SERVER_PORT $server_port; fastcgi_param SERVER_NAME $server_name; } location "/media" { autoindex on; root /home/somewhere/media; } access_log /var/log/nginx/whatever-you-want.access_log; error_log /var/log/nginx/whatever-you-want.error_log; } } |
上面有兩個虛擬站台,一個是給 www.whatever-you-want.com.tw ,一個是給 www.whatever-you-want.com 。www.whatever-you-want.com.tw 只是單純的靜態網站,預設首頁是 http://www.whatever-you-want.com.tw/index.html ,而它的硬碟位置在 /var/www/index.html 。
而使用者若是瀏覽 https://www.whatever-you-want.com/media 的連結,則 Nginx 會給它 /home/somewhere/media 資料夾內的所有檔案。除了 /media/.* 外,其他的連結都會用 3033 port 送到 Django FastCGI Server 處理。
而使用 https 的方法,只須要設定 3 個變數值: ssl , ssl_certificate , ssl_certificate_key 即可。設定完成後,用指令開啟 Nginx :
$ /usr/local/nginx/sbin/nginx
重新載入:
$ /usr/local/nginx/sbin/nginx -s reload
關閉:
$ /usr/local/nginx/sbin/nginx -s stop
這樣 Nginx 伺服器就建立完成了。
在新架構下,可以由系統管理員獨立控管 Nginx 網頁伺服器的開啟、關閉,而讓程式設計師,自行作 FastCGI Server 的管理,程設師自己作程式更新、套用,避免給予過多的權限。畢竟這兩者的知識領域是有別的,少有人兩邊都作得很好。
以下可能是 *nix(含 Mac) 專用(因為我不知道 Windows 能不能作 unix:socket 的指定)
如果我們一台機器有多個 django-base 的虛擬站台,那麼一個 django-base project 就要花一個 port ,這對於系統管理員及程式設計師而言,容易有搞亂的可能性,畢竟 “網址” <=> “port” <=> “django-base project” 的過程當中,是文字對應數字,再對應文字,難以記在人的腦中(也可能是我的記性比不上平均值吧!)。
所以我建議使用 Unix Socket 方式作對應。程式設計師把 socket 開在程式庫的 root 資料夾中,並取名為 django.socket 。再將 django.socket 權限設為 770 ,然後系統管理員把這個 django.socket 擁有群組設為 www-data 。
程式專案在 /home/someproject/ ,設定範例如下:
$ cd /home/someproject && /usr/bin/python2.7 manage.py runfcgi socket=`pwd`/django.socket method=threaded workdir=`pwd` pidfile=`pwd`/pid daemonize=true
上面程式設計師跑起一個 django-base 專案,並將 socket 開在 /home/someproject/django.socket 。
然後系統管理員作權限設定(也可以用 visudo 指給程式設計師作權限設定):
$ sudo chgrp www-data /home/someproject/django.socket
$ sudo chmod 770 /home/someproject/django.socket
系統管理員再把 nginx.conf 原本的 fastcgi_pass 127.0.0.1:3033 設定改如下:
fastcgi_pass unix:/home/someproject/django.socket;
改成這樣的設定方式,對程式設計師來說,永遠是把 socket 開在同一個專案資料夾中,並命名為 django.socket ,而系統管理員也知道一定是專案資料夾下的 django.socket 。少了數字 port 的對應記憶,減少錯誤的機率。